Introduction
In this tutorial we are showing how to use the PetaLinux workflow in order to prepare a bootable SD card for Zynq and ZynqMP devices. We will use the generated boot (BOOT.BIN) and kernel (image.ub) images but use an external Ubuntu roofs as our operating system. Additionally, we show how to reserve a DDR RAM memory subregion, excluding it from the usage of Linux kernel but making it accessible for custom usage (e.g. Direct Memory Access operations).
Before getting started, you may wonder why Ubuntu?
Ubuntu is one of the most popular Linux distributions, featuring desktop as well as server (headless) images. One of my favourite features is its handiness for installing and upgrading packages through the Advanced Packaging Tool:
$ apt install <your needed package>
But coming back to the raised question… In my experience (as a Linux newbie), the default PetaLinux Image is unpleasant to work with. On the other side, Ubuntu is easy to configure, update and has a huge community behind.
Prerequisites (Vivado)
Note: You can skip this section if you are going to use a Board Support Package (BSP), which already includes a default hardware project.
- Generate a Vivado project and instantiate a Zynq or ZynqMP block. A basic example is shown bellow
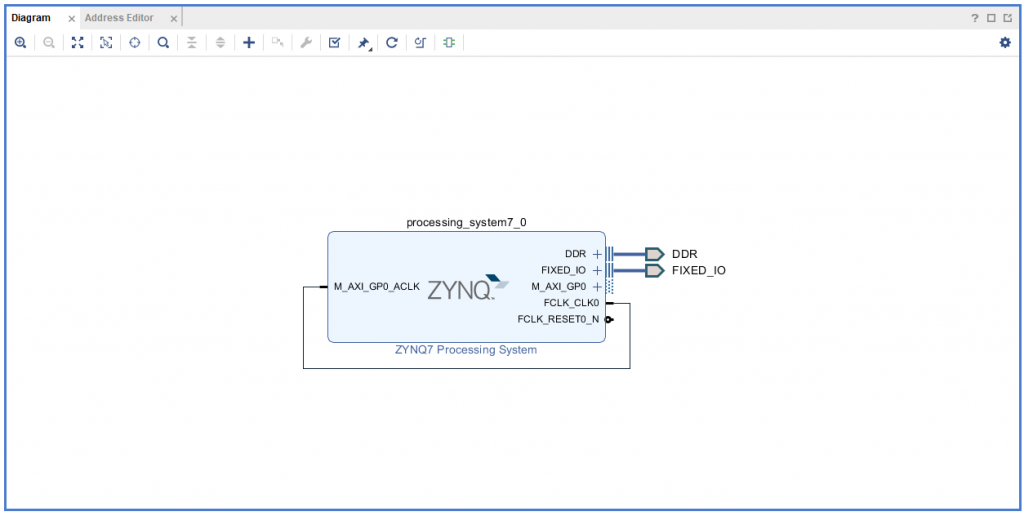
- Create HDL wrapper, run Syntesis, Implementation and Bitstream generation.
The default location of the bistream (.bit) file is <name_Vivado_project>.runs/impl_1/<name_block_design>_wrapper.bit. - Export the hardware of the implemented design: File->Export->Export Hardware (use the option Include Bitstream).
The default directory path containing the Hardware Description File (.hdf) is <name_Vivado_project>.sdk.
Prerequisites (PetaLinux)
- 8 GB RAM
- 2 GHz CPU clock or equivalent (minimum of 8 cores)
- 100 GB free HDD space
- Ubuntu Linux 16.04.3, 16.04.4 (64-bit) (other options listed in [2])
- SD card (min 8 GB)
System configuration and installation
- Install one of the above mentioned Ubuntu 64-bit versions. You can use a Virtual Machine for this as well. Note, that the PetaLinux environment does not work on WSL command line.
- Update APT and include the required side packages via the Ubuntu terminal:
$ sudo apt update
$ sudo apt-get install -y gcc git make net-tools libncurses5-dev tftpd zlib1g-dev libssl-dev flex bison libselinux1 gnupg wget diffstat chrpath socat xterm autoconf libtool tar unzip texinfo zlib1g-dev gcc-multilib build-essential libsdl1.2-dev libglib2.0-dev zlib1g:i386 screen pax gzip
- Download the PetaLinux tool here . If you are using a Xilinx development board, you can download as well the corresponding Board Support Package (BSP), which provides an example hardware design and drivers.
- Copy the downloaded files into the directory where you want the PetaLinux installation to be issued.
- Run the installer (substitute XXXX.X with the corresponding version):
$ ./petalinux-vXXXX.X-final-installer.run
- Agree EULA and take a coffee until the installation has finished. This may take some time… For further details and troubleshooting please check [2].
Create new PetaLinux project
- Open Terminal
- Source the PetaLinux settings script:
$ source <path-to-installed-PetaLinux>/settings.sh
- Create a new PetaLinux project. This can be done by either using the general zynq/zynqMP templates or by using a board specific BSP file (if available). In the first case we use:
$ petalinux-create --type project --template <type> --name <project_name>
where depending on your device <type> is ether zynq or zynqMP. And <project_name> is a custom name for your PetaLinux project. In the second case we use:
$ petalinux-create --type project --source <path_to_BSP_file> --name <project_name>
Configure PetaLinux project
- Move into the created Project:
$ cd <project_name>
Note: If you have used a BSP file for creating your project, you will see that under /hardware you find the default Vivado project. It includes the corresponding <name_Vivado_project>.runs/impl_1/<name_block_design>_wrapper.bit file and the <name_Vivado_project>.sdk directory. You can use them in the following steps if you have skipped the Vivado project generation.
- Initialise or update the hardware configuration for the PetaLinux project. For this you have to provide the path to the directory containing the Hardware Description File of your design. If your project was created using the
$ petalinux-config --get-hw-description=<path_to_dir_containing_hdf>
where <path_to_dir_containing_hdf> was defined in Prerequisites section of this tutorial.
Note: If your Vivado project was created on a distinct PC or you are using PetaLinux on a Virtual Machine, you may not be able to provide a path to the original directory. Alternatively, it is enough to have a local copy of the <name_Vivado_project>.sdk directory and provide PetaLinux the corresponding path.
- (If project was created using –source <path_to_BSP_file> ). We will use the default hardware description file and run:
$ petalinux-config
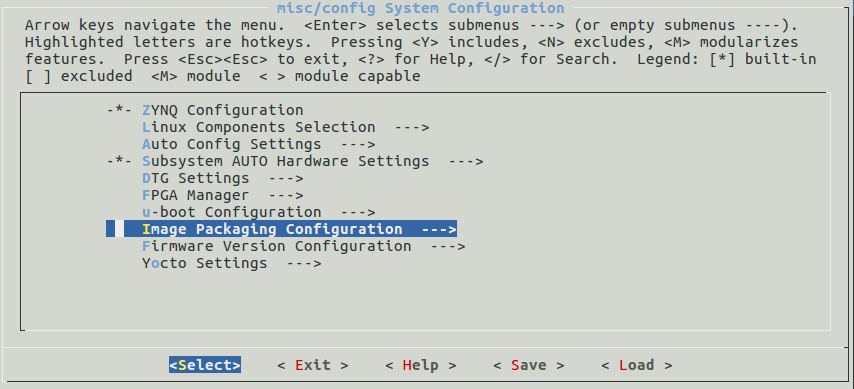
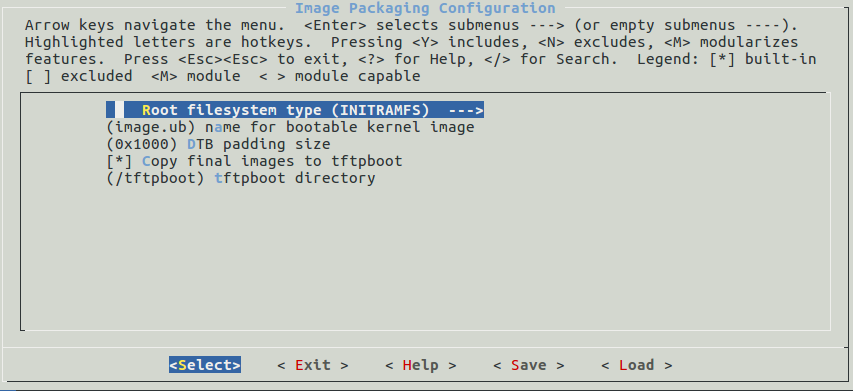
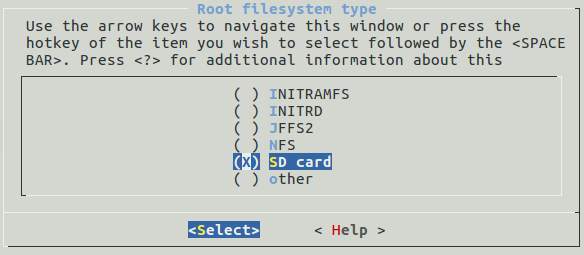
- Use the PetaLinux configuration tool to set the root filesystem to SD card (default is INITRAMFS).
Use Image Packaging Configuration -> Root filesystem->SD card.
- Exit the configuration tool and save.

- (OPTIONAL). You can exclude a certain memory region from the usage of Linux kernel and making it available only for a custom application. To this purpose, we pauinclude a reserved-memory node in the device-tree. This is, inside your PetaLinux project edit project-spec/meta-user/recipes-bsp/device-tree/files/system-user.dtsi.
We follow the examples in [4]. For a Zynq device (32-bit processor) and a reserved memory region starting at address 0x38000000 with a size of 0x08000000, system-user.dtsi becomes:
/include/ "system-conf.dtsi"/ {reserved-memory {#address-cells = <1>;#size-cells = <1>;ranges;reserved: buffer@0x38000000{no-map;reg = <0x380000000x08000000>;};};};
For a ZynqMP device (64-bit processor) and a reserved memory region starting at address 0x70000000 with a size of 0x10000000, system-user.dtsi becomes:
/include/ "system-conf.dtsi"/ {reserved-memory {#address-cells = <2>;#size-cells = <2>;ranges;reserved: buffer@0{no-map;reg = <0x00x700000000x00x10000000>;};};};
Build PetaLinux project
- Build the PetaLinux project (this may take up to 1 hour)
$ petalinux-build
- Create the boot image. For Zynq devcies use:
$ petalinux-package --boot --format BIN --fsbl images/linux/zynq_fsbl.elf --u-boot images/linux/u-boot.elf --fpga <path_to_bitstream> --force
where <path_to_bitstream> is the path of the bitstream file generated in the Vivado project (see section Prerequisites). For ZynqMP devices please use:
$ petalinux-package --boot --format BIN --fsbl images/linux/zynqmp_fsbl.elf --u-boot images/linux/u-boot.elf --pmufw images/linux/pmufw.elf --fpga <path_to_bitstream> --force
Note: If your Vivado project was created on a distinct PC or you are using PetaLinux on a Virtual Machine, you may not be able to provide a path to the original bitstream. Alternatively, it is enough to have a local copy of the bitstream and provide PetaLinux the corresponding path.
Prepare SD card
Please check reference [5], it provides an excellent tutorial on formatting the SD card for SD boot.
Load boot image
- Copy the images/linux/BOOT.BIN and /images/linux/image.ub files into the boot partition of the SD card. Within your PetalinuxProject, you can use the following Terminal commands:
$ sudo cp  images/linux/BOOT.BIN  /media/boot
$ sudo cp  images/linux/image.ub  /media/boot
(Down)load the root filesystem
- Download the Ubuntu root file system. We follow [6] and download the armhf (32-bit) filesystem which runs on both Zynq and ZynqMP devices. For Ubuntu 18.04 LTS run:
$ wget -c https://rcn-ee.com/rootfs/eewiki/minfs/ubuntu-18.04.3-minimal-armhf-2020-02-10.tar.xz
- Extract the filesystem:
$ tar xf ubuntu-18.04.3-minimal-armhf-2020-02-10.tar.xz
- Load the filesystem onto the root partition of the SD card and manage permissions:
$sudo tar xfvp ./*-*-*-armhf-*/armhf-rootfs-*.tar -C /media/root/$sync$sudochown root:root /media/root/$sudo chmod 755 /media/root/
Final steps…
- Prepare your device for SD card boot (check jumper settings).
- Insert the SD card and power on your Zynq/ZynqMP.
- Use SSH or the UART console to log into the Ubuntu OS
(User: ubuntu Password: temppwd)

- You are ready to go 🙂
Repository of build PetaLinux images
In our Github repository you can find BOOT.BIN and image.ub files for the following devices (including SD boot and reserved memory region):
- PynqZ1
- ZC706
- ZCU111
References and documentation
[1] Installing Ubuntu on Xilinx ZYNQ-7000 AP SoC Using PetaLinux
[2] PetaLinux Tools Documentation
[3] PetaLinux Command Line Reference Guide
[4] Linux Reserved Memory
[5] How to format SD card for SD boot
[6] Digi-Key Zynq-7000
[7] FPGA Manager Zynq
[8] FPGA Manager ZynqMP
Hi !
The tutorial is so good, but when I want to use pip using that rootfs it returns me the error: ERROR: Command errored out with exit status 1: command: /usr/bin/python3 /home/ubuntu/.local/lib/python3.8/site-packages/pip/_vendor/pep517/in_process/_in_process.py prepare_metadata_for_build_wheel /tmp/tmpe98rv825
I’m not sure if the problem is for the rootfs or other thing.
Please help !
Hello!
Thanks for your feedback. Here are the steps that worked for me:
* Update apt:
sudo apt update* Install pip3 via apt:
sudo apt install python3-pip* Use pip3 to install a python-3 package:
sudo pip3 package-nameI hope this helps.
Best regards,
Pau