Introduction
In this tutorial, we demonstrate how to build PYNQ [1] for the Cora-Z7-07S board [2]. PYNQ is a Python framework for FPGA development. It is a perfect platform for FPGA beginners but also for experienced developers interested in a rapid development of firmware demonstrators. Furthermore, if you are interested in improving the performance of your Python codes, PYNQ is a smart choice for interfacing with FPGA based hardware accelerators.
>>> Ready to use SD card image at end of this tutorial (see Resources).
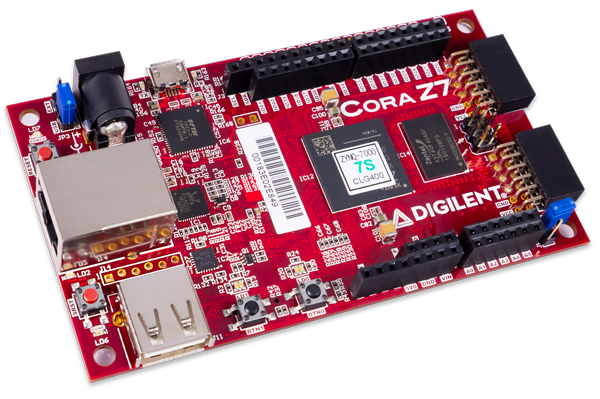
The Cora-Z7-07S board is the 99$ Zynq-7000 FPGA development board from Digilent. It fits an Zynq 7007 SoC (FPGA + microprocessor), 512 MB DDR3, 1Gb-ethernet, USB-host, serial port, 2 push buttons, 2 rgb LEDs, 2 PMODs and Arduino shield compatible IOs on a 10cm x 6cm PCB.

Prerequisites
We follow [3] and use:
- Virtual Machine with Ubuntu 16.04 / 18.04.
- Git clone PYNQ [4].
- Run PYNQ setup script:
source <PYNQ repository>/sdbuild/scripts/setup_host.sh
- Install Vivado.
See [3] for correct version. This tutorial was done using PYNQ 2.5, which implies Xilinx Tools version 2019.1 - Install Petalinux
Same version as Vivado.
- Download and unzip board agnostic rootfs (.img).
This tutorial uses PYNQ rootfs arm v2.5 from Ref. [5]. - Download PYNQ distribution tarball (.gz).
This tutorial uses pynq-2.5.tar.gz from Ref. [6]. - Reboot
BSP / Build Vivado base project
If you have compatible board support package (BSP), you can skip this step. At the time this tutorial was written, there was no official BSP v2019.1 for the Cora-Z7-07S board. Hence, we had to build a base project as follows:
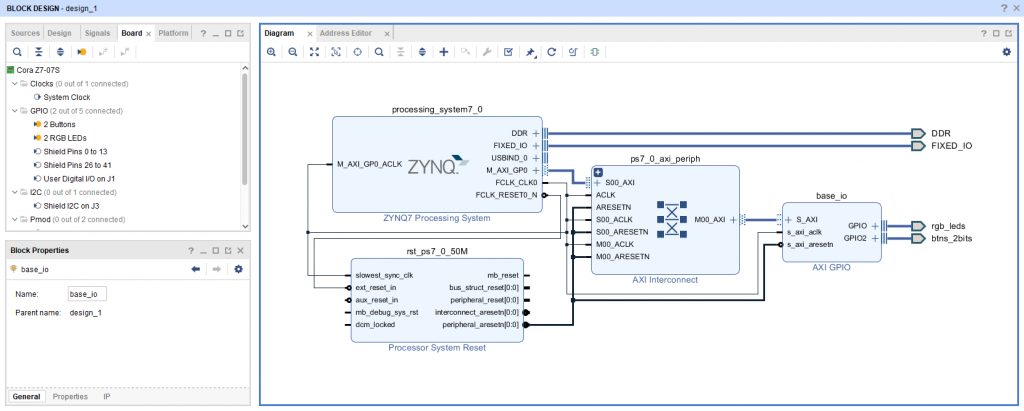
- Open Vivado and build the base design (for directly downloading this project please see the Resources at the end of this tutorial).

NOTE: The base project is only the default FPGA design upon which PYNQ is built. Do not worry about placing here your final design, you will be able to change the FPGA image at runtime by using custom overlays.
- Generate output products / bitstream.
- Export Hardware
- Export Block Design
- Create your base directory (you will use it in the following sections). It should have the following structure:
base/
   |__ base.bit
   |__ base.hwh
   |__ base.tcl
Where you have to copy the (.bit), (.hdw) and (.tcl) files form your Vivado base project and rename them into <base_dir_name>.bit , <base_dir_name>.hwh and <base_dir_name>.tcl , respectively.
- Create the BSP directory (you will use it in the following sections). It should have the following structure:
 petalinux_bsp/
   |__ hardware_project/
      |__ system.hdf
Where you have to copy the (.hdf) file form your Vivado base project and rename it into system.hdf.
Create PYNQ board directory
Open the cloned PYNQ repository and navigate to <PYNQ repository>/boards/ directory. Create a new board directory (we call it Pynq-Cora-Z7-07S/). In the following we populate the new board directory with the basic file structure for building PYNQ. This is slightly different if using a BSP file or the generated base Project.
If using BSP file
- Create the board Pynq-Cora-Z7-07S.spec specifications file
ARCH_Pynq-Cora-Z7-07S := arm
BSP_Pynq-Cora-Z7-07S := <path_to_bsp>
BITSTREAM_Pynq-Cora-Z7-07S :=

STAGE4_PACKAGES_Pynq-Cora-Z7-07S := pynq ethernet
NOTE: Bitstream will be automatically taken form BSP.
- The file structure should be as follows:
<PYNQ repository>/
   |__ boards/
      |__ Pynq-Cora-Z7-07S/
         |__Pynq-Cora-Z7-07S.spec
If using BASE PROJECT
- Create the board Pynq-Cora-Z7-07S.spec specifications file:
ARCH_Pynq-Cora-Z7-07S := arm
BSP_Pynq-Cora-Z7-07S :=
BITSTREAM_Pynq-Cora-Z7-07S := base/base.bit

STAGE4_PACKAGES_Pynq-Cora-Z7-07S := pynq boot_leds ethernet
NOTE: BSP will be automatically generated from system.hdf.
Include the base/ and petalinux_bsp/ folders. The file structure should be as follows:
<PYNQ repository>/
   |__ boards/
      |__ Pynq-Cora-Z7-07S/
         |__Pynq-Cora-Z7-07S.spec
         |__base/
            |__ base.bit
            |__ base.hwh
            |__ base.tcl
         |__petalinux_bsp/
            |__ hardware_project/
               |__ system.hdf
Make PYNQ
- Config PATH variable, source the settings files of Vivado, SDK and Petalinux, and disable Petalinux webtalks.
export PATH="/opt/crosstool-ng/bin:/opt/qemu/bin:$PATH"
source <path-to-vivado>/Vivado/2019.1/settings64.sh
source <path-to-sdk>/SDK/2019.1/settings64.sh
source <path-to-petalinux>/settings.sh
petalinux-util --webtalk off
NOTE: This step has to be repeated for every new terminal window.
- Make a dummy sudo call
sudo echo hello
- Navigate to <PYNQ repository>/sdbuild and run make with following parameters:
cd <PYNQ repository>/sdbuild
make PREBUILT=<path_to_board_agnostic_img> PYNQ_SDIST=<path_to_tarball> BOARDS=Pynq-Cora-Z7-07S
NOTE: The built process will take close to 1h and requires root permissions.
- The built image is located under:
<PYNQ repository>/sdbuild/output/Pynq-Cora-Z7-07S-2.5.img
Writing SD card image
- Burn the created PYNQ image onto the SD card following Ref. [7].
Run PYNQ
- Set the mode jumper J2 to enable the SD boot of your Cora-Z7-07S board.
- Insert the programmed SD card.
- Power on the device and connect to PYNQ. For getting started and first steps, please have a look at the PYNQ getting started guide [8].

Resources
- Git repository (Vivado base project / PYNQ boards)
- Pynq-Cora-Z7-07S-2.5.img
References
[1] PYNQ
[2] Cora-Z7-07S
[3] PYNQ SD card documentation
[4] PYNQ git repo
[5] PYNQ Boards / Board-Agnostic prebuilts
[6] PYNQ distribution tarball
[7] Program SD
[8] PYNQ getting started
